How to Delete Your Facebook Account forever
Saturday, June 16, 2018
Edit
How To Delete Your Facebook Account Forever: Prior to you erase your Facebook account, you ought to make you have duplicates of all your information that you have on Facebook. Particularly your photos. Do this manually, by clicking the Download and install web link beside any type of photos you wish to save as well as by duplicating and also pasting text from Facebook to Text Edit.
How To Delete Your Facebook Account Forever
If you intend to maintain a duplicate of everything, after that consider downloading and install all of your Facebook data. Comply with these actions to download and install all your data from Facebook:
Log in to Facebook.
Click on Menu (the tiny arrowhead in the leading right of the Facebook display) and choose Settings.
Click Download A Replicate of my Facebook Information.
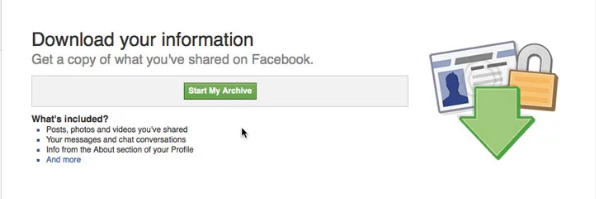
Click Start My Archive > Beginning My Archive and OK.
Facebook will currently begin to archive all of your info and will certainly send out an e-mail to you when the archive prepares to be downloaded. The file you download will certainly contain all the following:
Articles, images as well as videos you have actually shared.
Your messages and also chat conversations.
Information from the About section of your Profile.
There is additionally a great deal of other info from your Facebook account. You could see all the data that is downloaded in the data from this Facebook web page.
Idea! You can download an archive of your Facebook information even if you do not plan to delete your web page so you could check exactly what Facebook information gets on documents.
Remove your Facebook account: clear your Facebook history

The next step in removing your Facebook account is to get rid of any recent comments that you might not like. when you erase your Facebook account, the information may stick around for as much as 2 Week. This hold-up isn't excellent if you are in a hurry to get rid of an incriminating account.
In the meantime, you could start to delete personal info. Here is how you can remove a Blog post from Facebook:
Login to Facebook utilizing your account.
Click your Account name in the top-left corner of the screen.
Click the Arrowhead alongside a blog post you intend to remove, and pick Erase from the drop-down menu.
Check the Erase All Your iOS Task box.
Click Delete to eliminate the post.
Erase your Facebook account: removing images from Facebook
Before you deactivate your Facebook account, you might intend to get rid of any images connected with your account. Here is how you can get rid of Facebook pictures:
Visit to Facebook.
Click your Account name in the top-left corner of the screen.
Click on Photos.
Click the Edit Or Remove switch next to an unwanted picture, currently pick Delete This Photo.
Click Confirm.
You can just remove photos that have actually been uploaded by you; you can not remove pictures of you submitted by other people. These might be labelled as you, nevertheless (which determines you), and you can remove this tag.
Login to Facebook as well as click on your name in the top-left edge.
Click Photos of You.
Click Edit or Eliminate and choose Remove/Report Tag.
Place a tick alongside I Want To Untag Myself, and also tick I Desired This Picture Removed from Facebook. You have three alternatives below:
I Don't Like This Photo Of Me
I Believe This Photo Should Not be on FaceBook
It's spam.
Pick the one you desire as well as click on and also click Continue. You will certainly obtain another menu requesting for more information (if you pick I Don't Such as this Picture Of Me). Pick the one you desire as well as click Continue.
Erase your Facebook account: transform your name and account image
It takes a while for the Facebook deactivation to finish, and also in the interim your name will certainly stay on Facebook. You could not eliminate your name as well as email account from Facebook, yet you could change it to something unconnected to you. Comply with these steps:
Visit to your Facebook account
Click the Arrowhead in the top-right corner of the screen and also choose Setups.
Click Edit next to your Name.
Modification the information in First and Last name fields, enter your password and also click Conserve Adjustments. Note that Facebook stops you from utilizing 'XXXX' or other dummy details, so go into a false name.
Go back to your primary profile by clicking your Name and hover the computer mouse over your picture, now pick Update Profile Photo > Eliminate.
This eliminates the standard info of your account. You can also undergo and erase or replace various other details such as your birthday, the school you went to, and more.
Completely remove your Facebook account.

When you have a backup of all your information you prepare to begin erasing your Facebook account.
Comply with these actions to permanently delete your Facebook account:
Visit to Facebook.
Click the Privacy switch in the top-right (the symbol is shaped like a padlock) and also pick See More Setups.
Click Safety and security
Click Deactivate Your Account.
Select a reason for leaving from utilizing the checkbox list
Click the checkbox next to Pull out of getting future e-mails from Facebook.
Click Confirm
Enter your password and click Deactivate Now.
Which is your Facebook account removed. Or at the very least it will be deleted in 2 Week time. In the meantime if you enter your name as well as password back in to Facebook your account will be reactivated, so do not be lured to log back in.