Facebook Timeline Cover Photos
Monday, July 2, 2018
Edit
Facebook Timeline Cover Photos: The intro of Cover Photos to Facebook has actually permitted customers to tailor their accounts past their account pictures. Cover Photos offer you the power to add a personal touch to your Facebook Timeline. You can select any type of photo from your Facebook pictures or from your computer system.

1
Find or take the perfect photo. You could use any kind of picture documents to create your cover image. What you choose actually depends on what you want to represent you. This could be a landscape, getaway photo, art piece, or other photo you can picture.
Many people stay clear of utilizing a photo of themselves in the cover picture given that their picture is already displayed in the Profile photo. Rather, try to communicate a mood or outlook with your cover picture.
If you discover an image online that you intend to use, right-click on it as well as save it to your computer. Offer it a name that will be easy to remember, as you will need to locate it later.

2
Check the dimensions. Right-click on the photo on your computer system. Select Features and then click the Details tab. Seek the Dimensions entry.
Facebook cover images are 851px x 315px. If your picture is smaller than that, it will certainly be stretched to fit that dimension. This might result in distortion. If it is larger than that, you will be asked to pick which area of the image that you wish to show when you submit it. This indicates that parts of the photo will not be seen. [1] If you wish to resize a larger photo to ensure that the entire picture fits in the cover photo, see this guide.

3
Edit your photo if you want. Before you post your picture, make any type of edits and modifications in your recommended picture editing software. You can add quotes, touch-up flaws, and also much more. See this overview for some picture editing and enhancing ideas.

4
Open your Facebook account. As soon as your picture looks the way you desire, you will should submit it to your Facebook profile. Go to the Facebook web page, visit with your email and also password, then click your name in the upper-left corner of the Facebook web page.
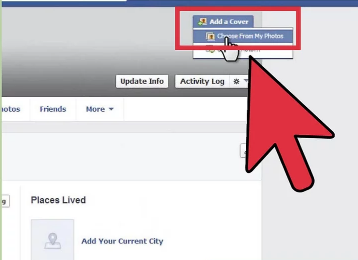
5
Float your mouse over your Cover Picture location. You will certainly see a button show up that says "Adjustment Cover". Clicking the switch will certainly enable you to choose a photo from your Facebook pictures or submit a photo from your computer. Click "Upload Photo" to pick the image from your computer.
Depending upon the size of the image and also the speed of your connection, the upload procedure might take a few minutes.

6
Placement the image. If the image is larger than 851px by 315px, you could click and drag the picture to establish what part of it is displayed. You could always change it later using the "Adjustment Cover" switch.
Facebook Timeline Cover Photos
1
Find or take the perfect photo. You could use any kind of picture documents to create your cover image. What you choose actually depends on what you want to represent you. This could be a landscape, getaway photo, art piece, or other photo you can picture.
Many people stay clear of utilizing a photo of themselves in the cover picture given that their picture is already displayed in the Profile photo. Rather, try to communicate a mood or outlook with your cover picture.
If you discover an image online that you intend to use, right-click on it as well as save it to your computer. Offer it a name that will be easy to remember, as you will need to locate it later.
2
Check the dimensions. Right-click on the photo on your computer system. Select Features and then click the Details tab. Seek the Dimensions entry.
Facebook cover images are 851px x 315px. If your picture is smaller than that, it will certainly be stretched to fit that dimension. This might result in distortion. If it is larger than that, you will be asked to pick which area of the image that you wish to show when you submit it. This indicates that parts of the photo will not be seen. [1] If you wish to resize a larger photo to ensure that the entire picture fits in the cover photo, see this guide.
3
Edit your photo if you want. Before you post your picture, make any type of edits and modifications in your recommended picture editing software. You can add quotes, touch-up flaws, and also much more. See this overview for some picture editing and enhancing ideas.
4
Open your Facebook account. As soon as your picture looks the way you desire, you will should submit it to your Facebook profile. Go to the Facebook web page, visit with your email and also password, then click your name in the upper-left corner of the Facebook web page.
5
Float your mouse over your Cover Picture location. You will certainly see a button show up that says "Adjustment Cover". Clicking the switch will certainly enable you to choose a photo from your Facebook pictures or submit a photo from your computer. Click "Upload Photo" to pick the image from your computer.
Depending upon the size of the image and also the speed of your connection, the upload procedure might take a few minutes.
6
Placement the image. If the image is larger than 851px by 315px, you could click and drag the picture to establish what part of it is displayed. You could always change it later using the "Adjustment Cover" switch.